
יום ראשון, 29 בנובמבר 2015
יום שבת, 28 בנובמבר 2015
The Most DELICIOUS Holiday Tea EVER! | 19th Day of Christmas 2015!
The 25 days of Christmas PLAYLIST starting from day one! https://www.youtube.com/playlist?list=PLAS8LtL7VU-ciE7XVzaRRVZRd28-e_QNB
Today Rebecca, Scott and Sharrah share an old family favorite recipe with you... Friendship Tea :-) Perfect for family time during the holidays and makes a lovely gift for someone you know for Christmas :-)
Heres what you need:
2 cups Tang
2 cups Country Time lemon drink
3/4 cup instant tea
2 cups sugar
1 tsp. ground cloves
2 tsp. ground cinnamon
2 small bottles red hots
Add to water or add to one part apple cider and one part water
ENJOY!
||Subscribe!||
My Channel: http://www.youtube.com/subscription_center?add_user=robesondesign
My Daughters Channel: http://www.youtube.com/subscription_center?add_user=robesondesignstudios
My Sons channel:
https://www.youtube.comsubscription_center?add_user=socaldude3077
Day 1: Broken Mirror Christmas Tree DIY - https://youtu.be/xSfxv4svX9Q
Day 2: 3 Easy Christmas Room Decor DIY's - https://youtu.be/CGNr--CEkjY
Day 3: How to Decorate a Built-In for Christmas - https://youtu.be/L98gN4DNr5E
Day 4: Felt Monogrammed Christmas Stocking -
https://youtu.be/i-6MXGM9bOA
Day 5: 10 Easy Steps to Decorating a BEAUTIFUL Christmas Tree! - https://youtu.be/iM4SExtMM84
Day 6: Holiday Antler Wall Art DIY -
https://youtu.be/J5fDR1sMP9o
Day 7: Top 5 Christmas Decorating Tips - https://youtu.be/HmisSkFCSvE
Day 8: How to DIY Ugly Christmas Sweaters - https://youtu.be/4uUcvpxAo0w
Day 9: How to Decorate an Outdoor Christmas Wreath - https://youtu.be/7Lza6XXpfVE?list=PLkA1hfccUV35MY8gHKaKySwkhEuOzLgO9
Day 10: 5 Easy Ways to INSTANTLY Decorate for Christmas - https://youtu.be/7k8DFRQ5y0k
Day 11: 3 Christmas Table Decorating Ideas - https://youtu.be/OBSNioec8yc
Day 12: DIY Distressed Metallic Gold Placemats - https://youtu.be/7k8DFRQ5y0k
Day 13: How To Create a Christmas Chandelier - https://youtu.be/4JaIy9JFb7o
Day 14: DIY Felt Christmas Tree Utensil Mats - https://youtu.be/EQGu396VDu0?list=PLkA1hfccUV35MY8gHKaKySwkhEuOzLgO9
Day 15: How to Make Christmas Crackers - https://youtu.be/oPdXE0iu3KQ?list=PLkA1hfccUV35MY8gHKaKySwkhEuOzLgO9
Day 16:
Day 17: Apothecary Jars
https://youtu.be/8X1Lv8Dud4U
Day 18:
INSTAGRAM: http://instagram.com/robesondesignteam
Click here to go to our website:
http://www.robesondesign.com
Click here to go to our Facebook:
http://www.facebook.com/RobesonDesign
Follow us on HOUZZ:
http://www.houzz.com/pro/rebeccarobeson/__public
Directed and Produced by Robeson Design.
Videography by Matthew Moran
Editing by Dorian Tucker
All exclusive music provided by Jimmy Robeson
https://robesonproductions.bandcamp.com/
Royalty free music by Epidemic Sound
How to Make Banana Decoration | Banana Art | Fruit Carving Banana Garnishes
More Pictures: http://paulartcooking.blogspot.co.uk/2015/10/art-in-banana-dolphins-fruit-carving.html
See this step-by-step video to understand how to quickly cut and serve as a Banana Dolphin. Good luck and Happy Learning!
Recommended What to Watch:
Art In Banana Show - Fruit Carving Yellow Dog Garnish - Party Garnishing - Food Decoration https://www.youtube.com/watch?v=tN61_WEXxxg
Art In Banana Yellow Duck Car | Fruit Carving Garnish | Banana Garnish (Italypaul) https://www.youtube.com/watch?v=H29AAi9nwLU
Art In Banana Show - Fruit Carving Yellow Dolphins Garnish https://www.youtube.com/watch?v=0v88IvzBZTY
Art in Banana Show - Minions Banana - Art of Vegetable and Fruit Carving Garnish https://www.youtube.com/watch?v=2FSw3pS-VcA
How to Make Banana Decoration | Banana Art | Fruit Carving Banana Garnishes https://www.youtube.com/watch?v=lUDeTijCobE
The Art of Vegetable and Fruit Carving
© Original works by ItalyPaul
http://www.italypaul.co.uk

יום חמישי, 26 בנובמבר 2015

יום שלישי, 24 בנובמבר 2015

יום ראשון, 22 בנובמבר 2015

יום שבת, 21 בנובמבר 2015
יום חמישי, 19 בנובמבר 2015

יום רביעי, 18 בנובמבר 2015

יום שלישי, 17 בנובמבר 2015
יום ראשון, 15 בנובמבר 2015

יום שבת, 14 בנובמבר 2015
Decorating an Outdoor Christmas Wreath! | 9th Day of Christmas 2015
The 25 days of Christmas PLAYLIST starting from day one! https://www.youtube.com/playlist?list=PLAS8LtL7VU-ciE7XVzaRRVZRd28-e_QNB
Do you find yourself frustrated by outdoor wreaths on french door gates? How do you decorate just one wreath when it opens down the center? Well, heres how I do it! Cut the Christmas wreath in HALF! With just a few quick tricks, you'll have a beautiful christmas outdoor wreath in no time!
||Subscribe!||
My Channel: http://www.youtube.com/subscription_center?add_user=robesondesign
My Daughters Channel: http://www.youtube.com/subscription_center?add_user=robesondesignstudios
Day 1: Broken Mirror Christmas Tree DIY - https://youtu.be/xSfxv4svX9Q
Day 2: 3 Easy Christmas Room Decor DIY's - https://youtu.be/CGNr--CEkjY
Day 3: How to Decorate a Built-In for Christmas - https://youtu.be/L98gN4DNr5E
Day 4: Felt Monogrammed Christmas Stocking - https://youtu.be/i-6MXGM9bOA
Day 5: 10 Easy Steps to Decorating a BEAUTIFUL Christmas Tree! - https://youtu.be/iM4SExtMM84
Day 6: Holiday Antler Wall Art DIY - https://youtu.be/J5fDR1sMP9o
Day 7: Top 5 Christmas Decorating Tips - https://youtu.be/HmisSkFCSvE
Day 8: How to DIY Ugly Christmas Sweaters - https://youtu.be/4uUcvpxAo0w
Day 9: How to Decorate an Outdoor Christmas Wreath - https://youtu.be/7Lza6XXpfVE?list=PLkA1hfccUV35MY8gHKaKySwkhEuOzLgO9
Day 10: 5 Easy Ways to INSTANTLY Decorate for Christmas - https://youtu.be/7k8DFRQ5y0k
INSTAGRAM: http://instagram.com/robesondesignteam
Click here to go to our website:
http://www.robesondesign.com
Click here to go to our Facebook:
http://www.facebook.com/RobesonDesign
Follow us on HOUZZ:
http://www.houzz.com/pro/rebeccarobeson/__public
Directed and Produced by Robeson Design.
Videography by Matthew Moran
Editing by Dorian Tucker
All exclusive music provided by Jimmy Robeson
https://robesonproductions.bandcamp.com/
Royalty free music by Epidemic Sound
יום שישי, 13 בנובמבר 2015
יום חמישי, 12 בנובמבר 2015

יום שלישי, 10 בנובמבר 2015

Quick Production Backdrop
One challenge that designers have is how to showcase their companies product in a simple but effective way. This is a great way to quickly create a dynamic stage for your products to be showcased.

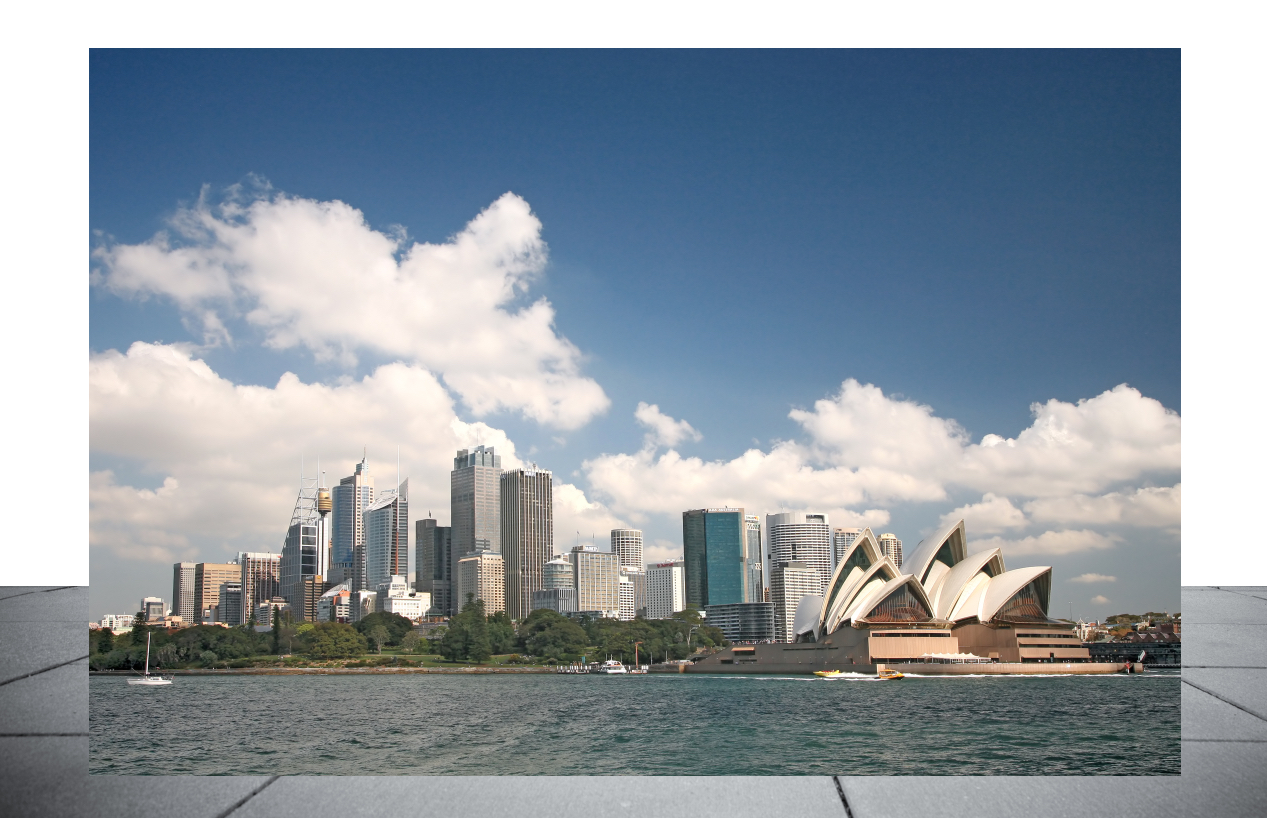
Find a good ground image
Start with a good looking section of ground… it can be whatever you want from concrete to grass to dirt… it is up to you and what you want to show.

cut out the ground
Now simply cut out the ground from the rest of the image and leave it on its own layer.

find a background
Find a suitable background image to be the setting for the product… Iconic skylines from around the world is a great way to give your product an international flavor.
place background
Drop the background into the document. Don’t worry if it is a little smaller than the ground image… as you will see in a minute the background doesn’t have to be tack sharp.

Resize and place behind "ground"
Resize the background to fit the image… be more focused on how the elements look rather than sharpness

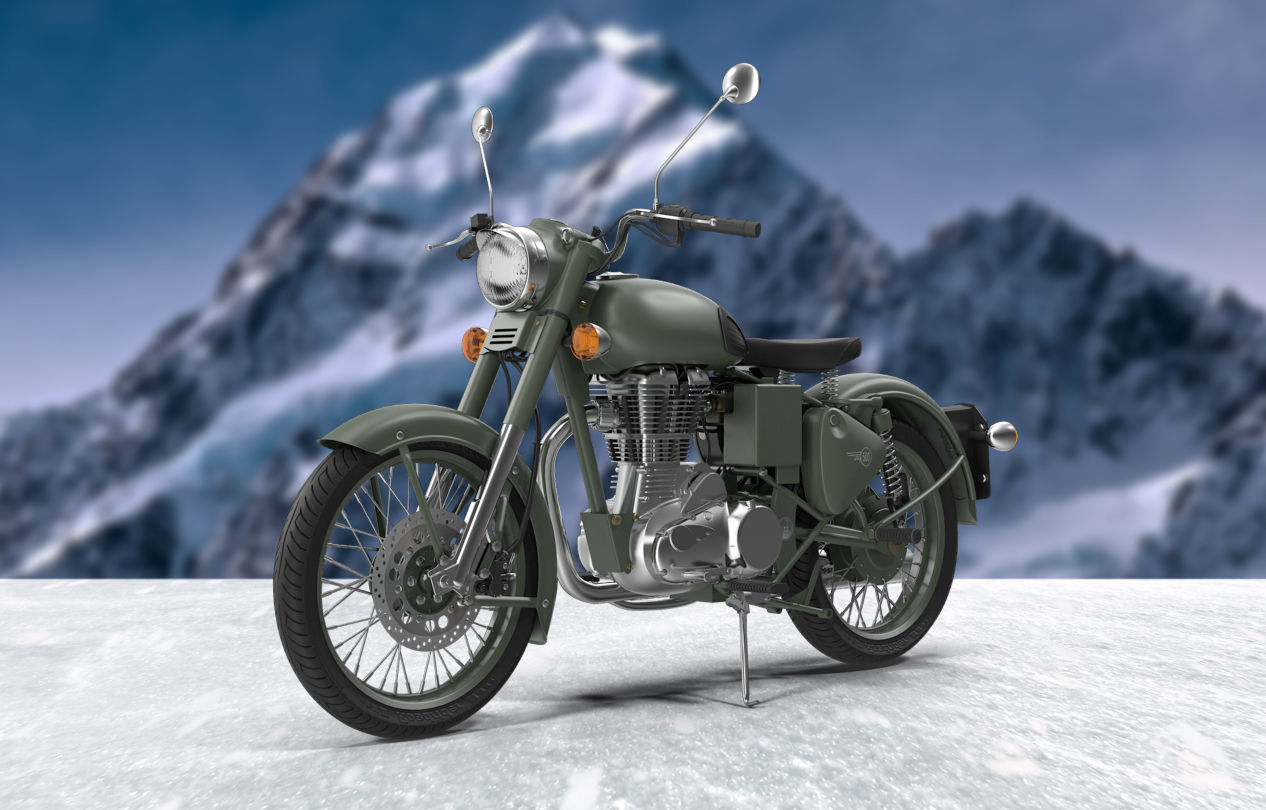
Adding the product looks ok, but the clarity of the background is a little distracting
Once you have the background in place, and you drop in your product image… the depth of field of the overall image can be a bit distracting. The eye doesn’t know whether to focus on the product or the skyline. Not what you want.

blur background to taste to help bring focus forward to product
Adding a Gaussian blur to the background will help focus the eye on the product while still giving the flavor of the background. Play with the amount of blur to find the visual sweet spot.

Darkening the background will also help
Along with sharpness… having the background too bright will grab the eye as well, so darken the background with an adjustment layer or Photo filter.
And there you go, in a couple of quick steps, you have an effective stage setting for your product.

You can try different backgrounds very quickly
It is now very easy to swap out both the background image and the ground image to change the flavor of the scene.
A new ground and background give a whole new look in no time
יום שני, 9 בנובמבר 2015


יום שישי, 6 בנובמבר 2015

יום חמישי, 5 בנובמבר 2015

יום רביעי, 4 בנובמבר 2015

Let is snow
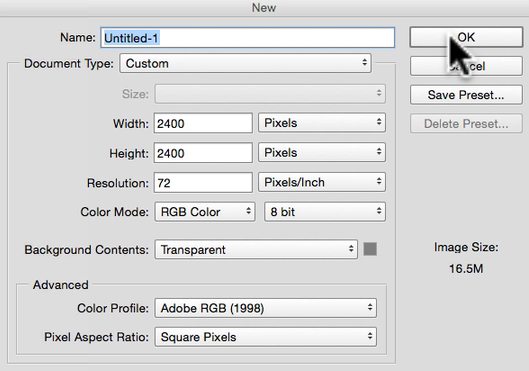
create new document
You will want to start out with a new document… size it according to your needs… I tend to make them fairly large so for this one 2400 x 2400… If you forget to fill the Background with white like I do… then file it with white using the Fill dialogue Shift + Delete.
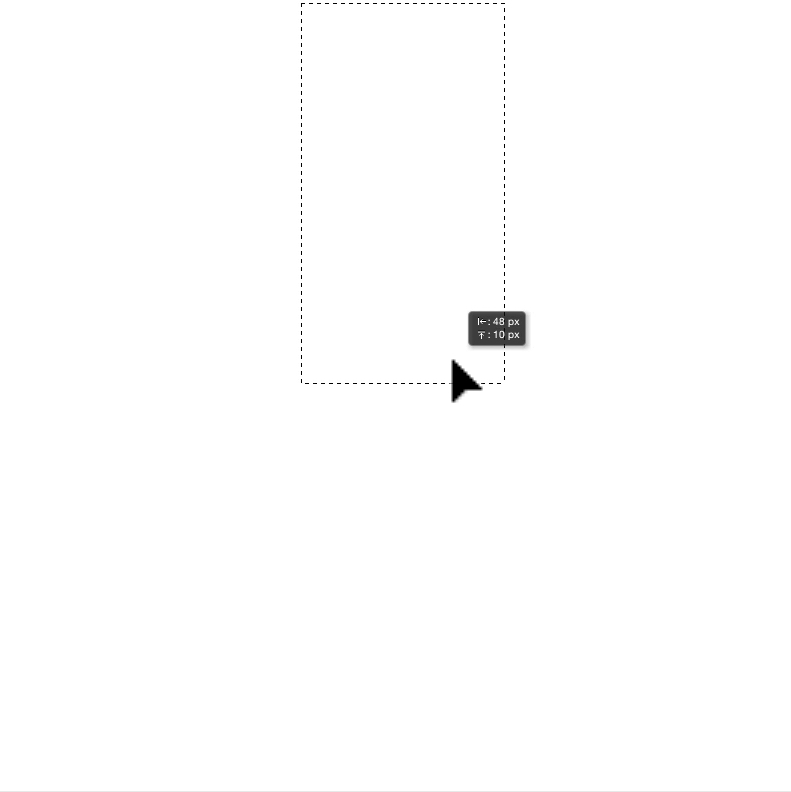
Make a selection
Use your rectangular Marquee tool (M) and drag out a rectangle about half the height of the document. Command-J (PC Ctrl-J) will copy the white section from the background onto a new layer
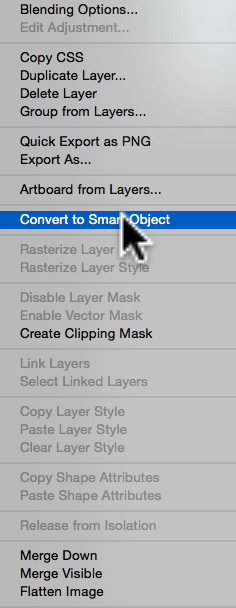
convert into Smart Object
Convert that new layer from the selection into a Smart Object. This will be the base for all the legs of the snowflake. Double click on the new Smart Object layer to open up the .psb file.

In the Smart Object window... use Fleur de Lis shape
Now grab the Fluer de Lis from the custom shapes tool and drag out the shape… you can decide to have it floating or have the base of it cut off like this one. The bottom edge of the frame is going to be the center fo the snowflake, so minute changes there can really affect the look of the flake. If you don’t have all of the shapes available… go up to the icon in the upper right of the shapes panel and click to bring up the drop down menu. Choose All and hit OK.

Saving in the Smart Object window means changes show up in the Snowflake document
Once you have the shape placed where you want it, Command-S (PC Ctrl-S) will save the changes to the .psb (Smart Object) and that will show up in your Snowflake document. (You don’t have to close the .psb file unless you want to. I leave it open to make changes on the fly… but if you mess up or the link between the open .psb file and your original document get messed up, then just close the .psb file and double click on the Smart Object layer in the Snowflake document to open up a new refreshed Smart Object window to make any new changes.)

Copy and rotate Smart Object 180 degrees
Command-J (PC Ctrl-J) will allow you to copy the Smart Object and then Command-T(PC Ctrl-T) to Transform it. Right Click and choose Rotate 180 degrees form the drop down menu. Drag the rotated shape down beneath the original while holding the Shift key to keep it constrained on line.

Copy both layers and rotate 60 degrees
Select both Smart Object layers and then Command-J (PC Ctrl-J) will make a copy. Use Command-T (PC Ctrl-t) to bring up the Transform handles. Up in the Options bar at the top type in 60 to the degrees window to rotate the two shapes 60 degrees. Change the blending modes of the new layers to Multiply so only the black shows through.

Repeat step one more time to complete snowflake
Repeat this last step one more time but change the rotation to 120 degrees if it doesn’t line up correctly with 60 degrees. Hit Enter twice to apply changes and your snowflake is ready.

Adding a couple of white dots/circles to the Fleur de Lis in the Smart Object window
What make this technique so handy, is that each leg of the snowflake is made from the same Smart Object, so a change to the original Smart Object will populate throughout the snowflake. It is like you have your own Kaleidoscope maker in a sense. Try adding black and white shapes and brushes to create a myriad of different looks.

The white dots instantly change the snowflake when the .psb file is saved
Now it is just a matter of seeing how many different looks you can make with this simple shape… and then try others. Have fun!
יום שני, 2 בנובמבר 2015

הקמת קיר צמחיה - ריצארד רוזנבאום - 052-2879654
ריצארד רוזנבאום, אגרונום, ומומחה להקמת קיר צמחיה יהפוך כל קיר עירום לפינה ירוקה בעמצאות שיטת גידול מבריקה שדורשת מעט שטח. גינה אנכית מהווה פתרון נהדר לגידול צמחים באזורים ללא מקום גידול
תוכלו למצוא עוד פרטים באתר http://verticalgardens.co.il/
תוכלו למצוא עוד פרטים באתר http://verticalgardens.co.il/
הירשם ל-
תגובות (Atom)